| 群星stellaris武器配件修改教程 | 您所在的位置:网站首页 › 群星巨像在哪 › 群星stellaris武器配件修改教程 |
群星stellaris武器配件修改教程
|
群星stellaris里面玩家可以通过修改脚本来改动游戏内容,不过也需要一些专业知识才能保证游戏的完整性,下面是玩家分享的武器配件修改教程,大家可以参考参考。
图片就是修改后的效果了 为了改着方便我还原英文版改的 好找文件 1、首先添加黑科技,研究后才能激活改之后的东西,你也不想电脑顶着你的黑科技虐你吧 D:\Stellaris\common\technology文件夹下是科技研究的文件,我加到00_eng_tech.txt文件里了,其他文件里面应该也一样,拉到文件最后面添加 tech_black_tech = { cost = 10 area = society category = { statecraft } tier = 1 weight = @tier1weight1 # just to add black technology for players weight_modifier = { modifier = { factor = 100 } } allow = { is_ai = no } ai_weight = { weight = 0 } } 添加完了我是在社会研究里找到的
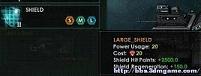
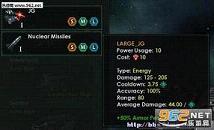
2、添加配件 配件武器文件都在D:\Stellaris\common\component_templates下,举例我要添加一个新的超强护盾,打开00_utilities_shields.txt文件,拉到最后添加 # Deflectors1 #这个是题头为了自己添加的东西看着方便 tility_component_template = { key = "SMALL_SHIELD" #这个很重要是部件的名称,改成跟原来文件不一样的 size = small #这个是配件的大小我这里依次添加了大中小三种配件 icon = "GFX_ship_part_shield_2" #这个是你安装到船上的配件显示样式 icon_frame = 1 power = @power_S1 #这个是电能消耗模板选择 在文件的最顶端可以自己添加模板 比如说添加一个@power_S6 = -50 把这里的S1改成S6那么消耗就会变成-50电源 这个运用会用在装甲什么的 cost = @cost_S1 #这个消耗矿物选择模板 modifier = { #这个就是物件加成的东西可以自己添加 ship_shield_hp_add = @shield_S6 ship_shield_regen_add = 50.0 #Regeneration per day } component_set = "SHIELD" #这个是游戏里调用的名称很重要改成一个跟原名不同的名字改下一个文件需要调用 prerequisites = { "tech_black_tech" } #这个就是科技研究需求了改成之前添加的自定义黑科技才能确保电脑不用 ai_weight = { #这个是让电脑不能用不过之前有黑科技研究垫底这个只是为了更保险 weight = 0 } utility_component_template = { key = "MEDIUM_SHIELD" size = medium icon = "GFX_ship_part_shield_2" icon_frame = 1 power = @power_M1 cost = @cost_M1 modifier = { ship_shield_hp_add = @shield_M6 ship_shield_regen_add = 100.0 #Regeneration per day } component_set = "SHIELD" prerequisites = { "tech_black_tech" } ai_weight = { weight = 0 } } utility_component_template = { key = "LARGE_SHIELD" size = large icon = "GFX_ship_part_shield_2" icon_frame = 1 power = @power_L1 cost = @cost_L1 modifier = { ship_shield_hp_add = @shield_L6 ship_shield_regen_add = 150.0 #Regeneration per day } component_set = "SHIELD" prerequisites = { "tech_black_tech" } ai_weight = { weight = 0 } } 原文件对比: # Deflectors utility_component_template = { key = "SMALL_SHIELD_1" size = small icon = "GFX_ship_part_shield_1" icon_frame = 1 power = @power_S1 cost = @cost_S1 modifier = { ship_shield_hp_add = @shield_S1 ship_shield_regen_add = 1.2 #Regeneration per day } prerequisites = { "tech_shields_1" } component_set = "SHIELD_1" } utility_component_template = { key = "MEDIUM_SHIELD_1" size = medium icon = "GFX_ship_part_shield_1" icon_frame = 1 power = @power_M1 cost = @cost_M1 modifier = { ship_shield_hp_add = @shield_M1 ship_shield_regen_add = 2.4 #Regeneration per day } prerequisites = { "tech_shields_1" } component_set = "SHIELD_1" } utility_component_template = { key = "LARGE_SHIELD_1" size = large icon = "GFX_ship_part_shield_1" icon_frame = 1 power = @power_L1 cost = @cost_L1 modifier = { ship_shield_hp_add = @shield_L1 ship_shield_regen_add = 3.6 #Regeneration per day } prerequisites = { "tech_shields_1" } component_set = "SHIELD_1" } 2、新物品添加完成 接下来要让他显示出来需要到下一个文件D:\Stellaris\common\component_sets的00_utilities_shields.txt里添加 component_set = { key = "SHIELD" #这个就是之前自己添加的物件调用名称了 icon = "GFX_ship_part_shield_2" #这个是在左侧物品栏里的显示样式最好是跟上面自己设置的样式相同要不安装上就会变成上面自己设定的样式 icon_frame = 1 } 3、添加武器要除了做完上边两步之后还要增加一个文件的修改就是那个D:\Stellaris\common\component_templates下的weapon_components.csv文件 这个文件是设定武器效果值的 如果不改的话武器是新的但是调用的效果还是之前的比如杀伤射程 下面是我改的第一个红光激光00_weapons_energy.txt里的第一个武器,把他大中小三个模式复制粘到文件最后面然后更改 ### JG weapon_component_template = { key = "SMALL_JG" #这个是调用什么武器需要在weapon_components.csv里面添加你也可以调用别的武器的数值 自由发挥 size = small entity = "small_laser_gun_entity" type = instant icon = "GFX_ship_part_laser_1" icon_frame = 1 component_set = "JG" projectile_gfx = "infrared_laser_s" tags = { weapon_type_energy } #tags must be pre-registered in common/weapon_tags prerequisites = { "tech_black_tech" } ai_weight = { weight = 0 } } weapon_component_template = { key = "MEDIUM_JG" size = medium entity = "medium_laser_gun_entity" type = instant icon = "GFX_ship_part_laser_1" icon_frame = 1 component_set = "JG" projectile_gfx = "infrared_laser_m" tags = { weapon_type_energy } prerequisites = { "tech_black_tech" } ai_weight = { weight = 0 } } weapon_component_template = { key = "LARGE_JG" size = large entity = "large_laser_gun_entity" type = instant icon = "GFX_ship_part_laser_1" icon_frame = 1 component_set = "JG" projectile_gfx = "infrared_laser_l" tags = { weapon_type_energy } prerequisites = { "tech_black_tech" } ai_weight = { weight = 0 } } 具体更改方法跟部件差不多 下面说下在weapon_components.csv文件里添加自己新武器的效果 打开weapon_components.csv文件找到原来那个红光激光的大中小三种模式复制下来 然后粘到最后面进行更改 改后的: SMALL_JG;2.50;-2.50;25.00;50.00;1.00;0.00;0.50;2.00;23.00;25.00;70.00;1.00;0.00; MEDIUM_JG;5.00;-5.00;65.00;90.00;1.00;0.00;0.50;2.00;23.00;25.00;75.00;1.00;0.00; LARGE_JG;10.00;-10.00;125.00;205.00;1.00;0.00;0.50;2.00;23.00;25.00;80.00;1.00;0.00; 原武器配置: SMALL_RED_LASER;2.50;-2.50;5.00;10.00;1.00;0.00;0.50;2.00;23.00;25.00;15.00;0.82;0.00; MEDIUM_RED_LASER;5.00;-5.00;13.00;18.00;1.00;0.00;0.50;2.00;23.00;25.00;25.00;0.80;0.00; LARGE_RED_LASER;10.00;-10.00;25.00;41.00;1.00;0.00;0.50;2.00;23.00;25.00;35.00;0.75;0.00; 这个是每个数值对应的效果,跟上面一样用分号隔开的看着有点乱 我英文超差只能看个大概就不翻译了 key;cost;power;min_damage;max_damage;shield_damage;shield_penetration;armor_penetration;min_windup;max_windup;cooldown;range;accuracy;missile_speed;end 好了愉快的虐电脑吧 |


【本文地址】