| ubuntu下webbench作网站压力测试教程【webbench安装】 | 您所在的位置:网站首页 › webbench安装 › ubuntu下webbench作网站压力测试教程【webbench安装】 |
ubuntu下webbench作网站压力测试教程【webbench安装】
|
webbench最多可以模拟3万个并发连接去测试网站的负载能力,个人感觉要比Apache自带的ab压力测试工具好,安装使用也特别方便。 1. 安装教程 1.1 安装依赖 exuberant-ctags sudo apt-get install exuberant-ctags 1.2 下载源码并安装 wget http://blog.s135.com/soft/linux/webbench/webbench-1.5.tar.gz tar zxvf webbench-1.5.tar.gz cd webbench-1.5 make && sudo make install
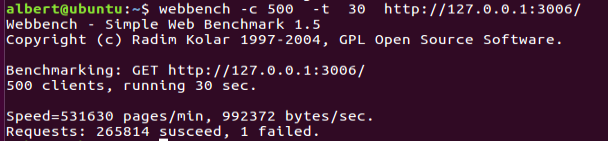
注意:若是提示 make cc command not found,则须要安装c/c++编译环境linux sudo apt-get install build-essential 1.3 经常使用方法及指令说明 webbench -c 500 -t 30 http://127.0.0.1:3006/ 参数说明:-c表示并发数,-t表示时间(秒)注意:http://127.0.0.1:3006/是我编写的一个网站
webbench首先fork出多个子进程,每个子进程都循环做web访问测试。子进程把访问的结果通过pipe告诉父进程,父进程做最终的统计结果。 参考:https://cloud.tencent.com/developer/article/1478832 |


 也可以对于百度进行测试:
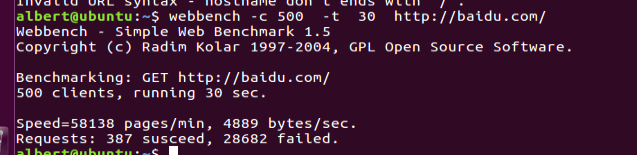 失败这么多,可能是因为百度会进行ip监测吧,毕竟大公司,好吧,其实我也不知道的!
【本文地址】
公司简介
联系我们