| 【Unity游戏开发】UGUI不规则区域点击的实现 | 您所在的位置:网站首页 › unity不规则模型碰撞 › 【Unity游戏开发】UGUI不规则区域点击的实现 |
【Unity游戏开发】UGUI不规则区域点击的实现
|
一、简介
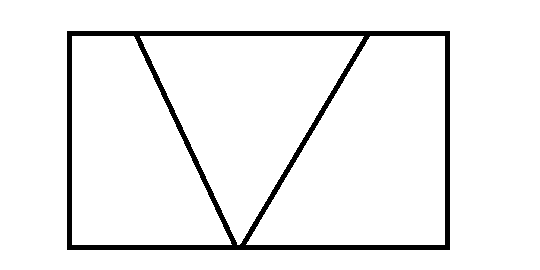
马三从上一家公司离职了,最近一直在出去面试,忙得很,所以这一篇博客拖到现在才写出来。马三在上家公司工作的时候,曾处理了一个UGUI不规则区域点击的问题,制作过程中也有一些收获和需要注意坑,因此记录成博客与大家分享。众所周知在UGUI中,响应点击通常是依附在一张图片上的,而图片不管美术怎么给你切,导进Unity之后都是一个矩形,如果要做其他形状,最多只能旋转一下,或者自己做一些处理。而为了美术效果,很多时候我们不得不需要特定形状的UI,并且让它们实现精准的响应点击。例如下图就是一个不规则的点击区域。
图1:UGUI不规则点击区域示意图 下面是处理了不规则区域点击后的演示效果,当点击按钮的时候,会对点击次数进行累加并且打印到控制台。可以看到进行了不规则区域点击处理以后,对我们原来的普通矩形Sprite的点击不会产生到影响,而不规则区域的表现效果也符合我们的预期。
图2:规则区域与不规则区域点击效果对比 二、针对UGUI不规则区域点击的两种处理方法针对UGUI的不规则区域响应点击,一般来说有两种处理办法: 1.精灵像素检测:该方法是指通过读取精灵(Sprite)在某一点的像素值(RGBA),如果该点的像素值中的Alpha小于一定的阈值(比如0.5)则表示该点处是透明的,即用户点击的位置在精灵边界以外,否则用户点击的位置在精灵边界内部。 2.通过算法计算碰撞区域:通过一定的算法,手动计算出碰撞区域,然后在判断用户是点击在了精灵上面,还是点击在精灵外部。 1.精灵像素检测法首先来说下精灵像素检测法,因为它实现起来比较简单也好理解。uGUI在处理控件是否被点击的时候,主要是根据IsRaycastLocationValid这个方法的返回值来进行判断的,而这个方法用到的基本原理则是判断指定点对应像素的RGBA数值中的Alpha是否大于某个指定临界值。例如,我们知道半透明通常是指Alpha=0.5,而对一个后缀名为png格式的图片来说半透明或者完全透明的区域理论上不应该被响应的,所以根据这个原理,我们只需要设定一个透明度的临界值,然后对当前鼠标位置对应的像素进行判断就可以了,因此这种方法叫做精灵像素检测。对于上面的这个IsRaycastLocationValid接口,我们可以通过下载UGUI源码或者反编译的方式看到它的实现: 1 public virtual bool IsRaycastLocationValid(Vector2 screenPoint, Camera eventCamera) 2 { 3 //当透明度>=1.0时,表示点击在可响应区域返回true 4 if(this.m_EventAlphaThreshold >= 1f){ 5 return true; 6 } 7 8 //当没有指定精灵时返回true,因为不指定Spirte的时候,Unity将其区域填充为默认的白色,全部区域都是可以响应点击的 9 Sprite overrideSprite = this.overrideSprite; 10 if(overrideSprite == null){ 11 return true; 12 } 13 14 //坐标系转换 15 Vector2 local; 16 RectTransformUtility.ScreenPointToLocalPointInRectangle(base.rectTransform, screenPoint, eventCamera, ref local); 17 Rect pixelAdjustedRect = base.GetPixelAdjustedRect (); 18 local.x += base.rectTransform.get_pivot ().x * pixelAdjustedRect.get_width (); 19 local.y += base.rectTransform.get_pivot ().y * pixelAdjustedRect.get_height (); 20 local = this.MapCoordinate(local, pixelAdjustedRect); 21 Rect textureRect = overrideSprite.get_textureRect (); 22 Vector2 vector = new Vector2(local.x / textureRect.get_width (), local.y / textureRect.get_height ()); 23 24 //计算屏幕坐标对应的UV坐标 25 float num = Mathf.Lerp(textureRect.get_x (), textureRect.get_xMax (), vector.x) / (float)overrideSprite.get_texture().get_width(); 26 float num2 = Mathf.Lerp(textureRect.get_y (), textureRect.get_yMax (), vector.y) / (float)overrideSprite.get_texture().get_height(); 27 bool result; 28 29 //核心方法:像素检测 30 try{ 31 result = (overrideSprite.get_texture().GetPixelBilinear(num, num2).a >= this.m_EventAlphaThreshold); 32 }catch(UnityException ex){ 33 Debug.LogError("Using clickAlphaThreshold lower than 1 on Image whose sprite texture cannot be read. " + ex.Message + " Also make sure to disable sprite packing for this sprite.", this); 34 result = true; 35 } 36 38 return result; 39 }可以看到大概的思路就是经过一系列的坐标转换之后,将一个UV坐标的Alpha值与临界值作比较。基于这个像素这个思路我们又可以衍生出两种解决方案,一是直接更改临界值,二是在像素检测的思路上进行拓展与重写,定制我们自己的像素检测方法。 先来看下第一种直接更改阈值的方法,Unity在Image组件中为我们暴露出了一条属性alphaHitTestMinimumThreshold。关于它的含义我们可以参考Unity的官方文档:
图3:alphaHitTestMinimumThreshold属性文档 大概的意思就是点击的时候会将该像素的Alpah值与该阈值进行比较,Alpha小于该阈值的部分的点击事件会被忽略掉,意思也就是某一像素的Alpha只有大于设定的阈值,你才能接到响应事件。当值为1的时候,表示只有完全不透明的部分才能响应。默认值为0,即一个Image不管透明不透明的部分,都会参与事件的响应。为了能够让alphaHitTestMinimumThreshold这个属性生效和工作,我们需要把Advance选项中的Read/Writeable属性勾选上。 因此我们将alphaHitTestMinimumThreshold值设置为一个合理的范围就可以实现不规则区域的点击了,代码如下: 1 using System.Collections; 2 using System.Collections.Generic; 3 using UnityEngine; 4 using UnityEngine.UI; 5 6 /// 7 /// 不规则区域Button 8 /// 9 [RequireComponent(typeof(RectTransform))] 10 [RequireComponent(typeof(Image))] 11 public class IrregulaButton : MonoBehaviour 12 { 13 [Tooltip("设定Sprite响应的Alpha阈值")] 14 [Range(0, 0.5f)] 15 public float alpahThreshold = 0.5f; 16 17 private void Awake() 18 { 19 var image = this.GetComponent(); 20 if (null != image) 21 { 22 image.alphaHitTestMinimumThreshold = alpahThreshold; 23 } 24 } 25 }第二种基于像素检测的解决方案是自己重写IsRaycastLocationValid接口里面像素检测方法,将屏幕坐标转换为UI坐标,然后再根据Sprite的类型做一些处理,最后根据x,y坐标取出像素的Alpha值与我们的阈值进行比较,具体代码如下: using UnityEngine; using UnityEngine.UI; /// /// 不规则区域图形检测组件 /// [RequireComponent(typeof(RectTransform))] [RequireComponent(typeof(Image))] public class IrregularRaycastMask : MonoBehaviour, ICanvasRaycastFilter { private Image _image; private Sprite _sprite; [Tooltip("设定Sprite响应的Alpha阈值")] [Range(0, 0.5f)] public float alpahThreshold = 0.5f; void Start() { _image = GetComponent(); } /// /// 重写IsRaycastLocationValid接口 /// /// /// /// public bool IsRaycastLocationValid(Vector2 sp, Camera eventCamera) { _sprite = _image.sprite; var rectTransform = (RectTransform)transform; Vector2 localPositionPivotRelative; RectTransformUtility.ScreenPointToLocalPointInRectangle((RectTransform)transform, sp, eventCamera, out localPositionPivotRelative); // 转换为以屏幕左下角为原点的坐标系 var localPosition = new Vector2(localPositionPivotRelative.x + rectTransform.pivot.x * rectTransform.rect.width, localPositionPivotRelative.y + rectTransform.pivot.y * rectTransform.rect.height); var spriteRect = _sprite.textureRect; var maskRect = rectTransform.rect; var x = 0; var y = 0; // 转换为纹理空间坐标 switch (_image.type) { case Image.Type.Sliced: { var border = _sprite.border; // x 轴裁剪 if (localPosition.x maskRect.width - border.z) { x = Mathf.FloorToInt(spriteRect.x + spriteRect.width - (maskRect.width - localPosition.x)); } else { x = Mathf.FloorToInt(spriteRect.x + border.x + ((localPosition.x - border.x) / (maskRect.width - border.x - border.z)) * (spriteRect.width - border.x - border.z)); } // y 轴裁剪 if (localPosition.y maskRect.height - border.w) { y = Mathf.FloorToInt(spriteRect.y + spriteRect.height - (maskRect.height - localPosition.y)); } else { y = Mathf.FloorToInt(spriteRect.y + border.y + ((localPosition.y - border.y) / (maskRect.height - border.y - border.w)) * (spriteRect.height - border.y - border.w)); } } break; case Image.Type.Simple: default: { // 转换为统一UV空间 x = Mathf.FloorToInt(spriteRect.x + spriteRect.width * localPosition.x / maskRect.width); y = Mathf.FloorToInt(spriteRect.y + spriteRect.height * localPosition.y / maskRect.height); } break; } // 如果texture导入过程报错,则删除组件 try { return _sprite.texture.GetPixel(x, y).a > alpahThreshold; } catch (UnityException e) { Debug.LogError("Mask texture not readable, set your sprite to Texture Type 'Advanced' and check 'Read/Write Enabled'" + e.Message); Destroy(this); return false; } } }最后为了验证我们的组件是否生效,可以在按钮上挂载一个ButtonClickCounter 脚本,当接收到点击事件的时候,记录点击次数并打印到控制台方便观察,具体代码如下: 1 using System.Collections; 2 using System.Collections.Generic; 3 using UnityEngine; 4 using UnityEngine.UI; 5 6 /// 7 /// 按钮点击次数计数器 8 /// 9 public class ButtonClickCounter : MonoBehaviour 10 { 11 private int count = 0; 12 private string btnName; 13 14 void Start() 15 { 16 var text = this.transform.Find("Text").GetComponent(); 17 btnName = text.text; 18 } 19 20 21 public void Click() 22 { 23 count++; 24 Debug.Log(string.Format("{0}点击了{1}次!", btnName, count)); 25 } 26 }我们只要简单地直接把组件挂载到Image上面便可以生效了,具体截图如下:
图4:不规则区域检测组件使用 2.通过算法计算碰撞区域法对于这种实现不规则碰撞区域的方法,马三并没有进行深入地研究,因为马三觉得挑选一个可靠的检测碰撞算法不是很容易,既要考虑到它的精准性又要考虑当图形复杂以后的计算效率,因此从易用性上面来讲,不如第一种实现方案好。关于这种方法的实现和原理,马三也是从网上搜集的一些资料进行整理的,感兴趣的读者可以深入研究一下哈,下面很多内容都是马三搜集整理网上大神的文章的资料得来的,其中给出了许多链接,大家可以直接参看链接里面的内容。 该方法是指给精灵(Sprite)添加一个多边形碰撞器(Rolygon Collider)组件,利用该组件来标记精灵的边界,这样通过比较鼠标位置和边界可以判断点击是否发生在精灵内部。关于这个算法与实现,PayneQin大神已经在他的博客中做了很详细的解析和说明,大家可以直接去看他的博客。知乎上关于判断一个点是否在多边形内部也有很多算法地讨论,具体可以看这里。其中这篇文献提供了判断一个点是否在任意多边形内部的两种方法,分别为Corssing Number和Winding Number。这两种方法在理论层面的相关细节请大家自行阅读这篇文章,PayneQin大神选择的是前者实现,其基本思想是计算从该点引出的射线与多边形边界相交的次数,当其为奇数时表示该点在多边形内部,当其为偶数时表示在多边形外部。马三在网上找到了相关的实现(偷懒): 1 bool ContainsPoint2(Vector2[] polyPoints,Vector2 p) 2 { 3 //统计射线和多边形交叉次数 4 int cn = 0; 5 6 //遍历多边形顶点数组中的每条边 7 for(int i=0; i p.y) && (polyPoints [i + 1].y |


【本文地址】