| SpringBoot框架详细介绍 | 您所在的位置:网站首页 › springboot启动原理简介 › SpringBoot框架详细介绍 |
SpringBoot框架详细介绍
|
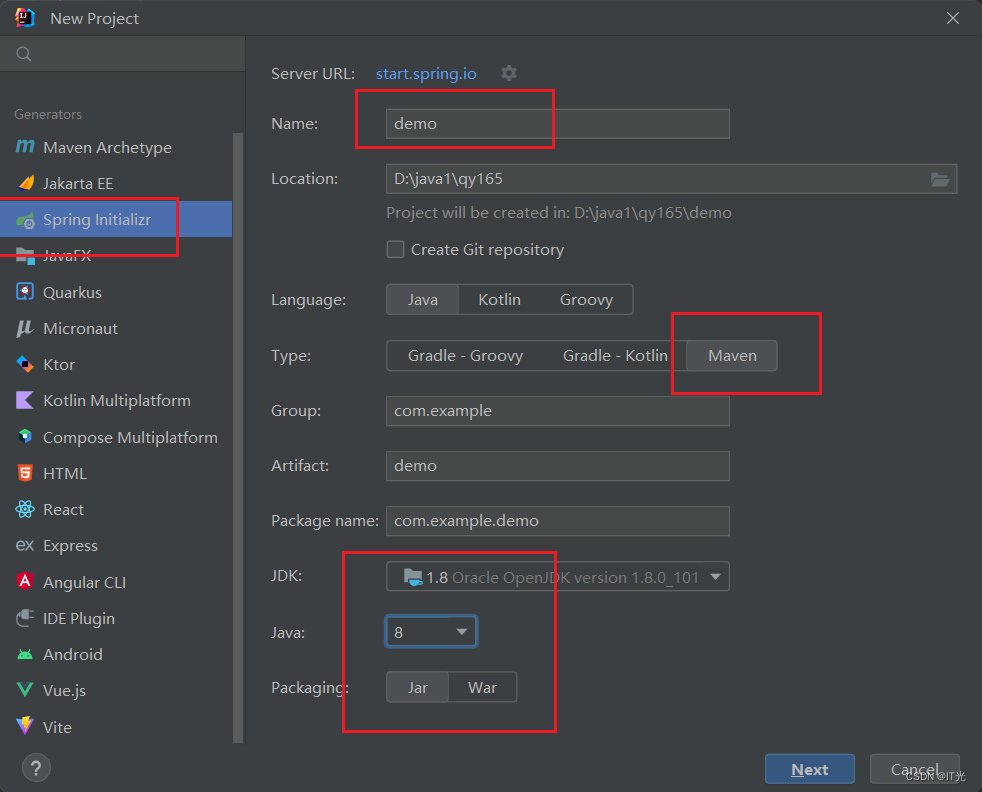
目录 1.SpringBoot简介 2. 搭建springboot工程 3. 了解pom.xml以及配置文件 4. springboot的配置文件种类 5. java读取springboot配置文件的内容。 第一种: @Value读取 第二种: @ConfigurationProperties 6.springboot多环境开发配置 7.springboot注册web三大组件 7.1 注册servlet到springboot内置的tomcat中 7.2注册web的filter组件 7.3注册web的监听器Listener组件 8.springboot自动装配原理 8.1springboot自动包扫描 8.2 自动装配原理 1.SpringBoot简介SpringBoot基于Spring4.0设计,不仅继承了Spring框架原有的优秀特性[IOC AOP DI],而且还通过简化配置来进一步简化了Spring应用的整个搭建和开发过程。另外SpringBoot通过集成大量的框架使得依赖包的版本冲突,以及引用的不稳定性等问题得到了很好的解决 特征: 可以快速独立的创建Spring应用程序并且基于其Maven或Gradle插件,可以创建可执行的JARs和WARs使用了嵌入式的Servlet容器,无需生成WAR包提供自动配置的“starter”项目对象模型(POMS) 以简化Maven配置大量的自动配置,极大地简化了我们的开发无需XML文件的大量编写,也不会生成代码,底层是利用SpringBoot写好的API来调用实现,开箱即用SpringBoot也有运维监控项目的功能SpringBoot与云计算的集成springboot:----为了简化spring工程的初始化搭建和开发过程。 2. 搭建springboot工程(1.)
(2.)
(3)
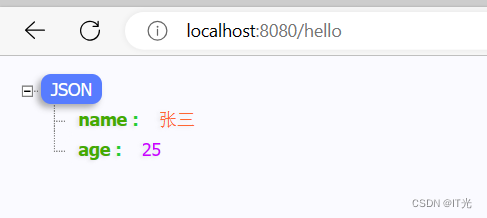
在主类所在的包下创建controller包并在该包下创建一个HelloController类 @RestController public class HelloController { @GetMapping("hello") public Map hello() { // 创建一个用于存储返回结果的Map对象 Map map = new HashMap(); // 向Map中添加名为"name"的键值对,值为"张三" map.put("name", "张三"); // 向Map中添加名为"age"的键值对,值为25 map.put("age", 25); // 返回存储结果的Map对象 return map; } }启动主函数: @SpringBootApplication public class SpringbootApplication { public static void main(String[] args) { SpringApplication.run(SpringbootApplication.class, args); } }浏览访问HelloContnroller下的路径资源:
pom.xml org.springframework.boot spring-boot-starter-parent 2.7.12application.properties application.properties配置文件是用于配置应用程序的各种属性和设置的文件。它是一个常见的外部配置文件,可以在其中指定应用程序的行为,包括数据库连接、端口号、日志级别、国际化设置等。 #Tomcat端口号[] key=value server.port=7777 # 设置工程的上下文路径 server.servlet.context-path=/aaa 4. springboot的配置文件种类properties:属性文件类型: 格式 key=value格式 application.properties #Tomcat端口号[] key=value server.port=7777 # 设置工程的上下文路径 server.servlet.context-path=/aaayml:文件类型: 格式: application.yml server: port: 8081 #Tomcat端口号[] servlet: context-path: /bbb #设置工程的上下文路径如果yml和properties都存在相同的配置,则以properties为主, 如果两个配置文件的内部不同。则合并。#不管是那种格式,他们的名称必须叫:application 5. java读取springboot配置文件的内容。比如:OSS文件上传。 需要: bucketName 密钥 id. 之前都是写死到类中。 如果改为客户的。需要修改java源码。 ---交付的war文件。通过java代码读取配置文件里面的内容 读取配置文件内容的方式: application.properties配置文件: student.name=zhangsan student.age=18 student.address=beijing 第一种: @Value读取使用@Value读取配置文件 @RestController public class HelloController { @Value("${student.name}") //读取springboot配置文件中student.name对应的内容 private String name; @Value("${student.age}") private String age; @Value("${student.address}") private String address; @GetMapping("stu") public String stu(){ return "姓名:"+name+";年龄:"+age+";地址:"+address; } } 第二种: @ConfigurationProperties@ConfigurationProperties(prefix="前缀") ---封装一个Student类 @ConfigurationProperties(prefix = "student") //配置文件中以student开头 @Data @Component //由spring容器帮你创建该类的对象,并把读取到配置文件中以student开头的内容配置给相应的属性 public class Student { private String name; private Integer age; private String address; //属性名要和配置文件中的名称相同 } @RestController public class HelloController { @Autowired private Student student; @GetMapping("main") public Student main(){ return student; } }注意:第一种方式只能读取(基本类型和字符串类型), 第二种方式可以读取任意类型 例: application.properties配置文件:(有集合,map就只能使用第二种,第一种会报错) student.name=zhangsan student.age=18 student.address=beijing student.hobby[0]=swing0 student.hobby[1]=swing1 student.hobby[2]=swing2 student.map.k1=v1 student.map.k2=v2 student.map.k3=v3封装一个Student类 @ConfigurationProperties(prefix = "student") //配置文件中以student开头 @Data @Component //由spring容器帮你创建该类的对象,并把读取到配置文件中以student开头的内容配置给相应的属性 public class Student { private String name; private Integer age; private String address; //属性名要和配置文件中的名称相同 private List hobby; private Mapmap; } @RestController public class HelloController { @Autowired private Student student; @GetMapping("main") public Student main(){ return student; } }上面application.properties配置文件 内容转换到 application.yml配置文件 student: address: beijing age: 18 hobby: - swing0 - swing1 - swing2 map: k1: v1 k2: v2 k3: v3 name: zhangsan在线yaml转properties-在线properties转yaml-ToYaml.com 6.springboot多环境开发配置环境: (1)开发环境 (2)测试环境 (3)生产环境【线上环境】 由于环境的不同,可能它们的配置也会不同 例:不同环境下的端口号不同 (1)application-dev.properties #针对关于开发的配置内容 server.port=8001(2) application-test.properties #针对关于测试环境的配置内容 server.port=8002(3)application-online.properties #针对关于线上环境的配置内容--- server.port=8003application.properties # 不同环境公共配置可以写在application student.name=zhangsan student.age=18 student.address=beijing student.hobby[0]=swing student.hobby[1]=eating student.hobby[2]=sleeping student.map.k1=v1 student.map.k2=v2 student.map.k3=v3 #激活相应的环境配置---每个环境的文件配置名必须:application-xxx.properties spring.profiles.active=dev 7.springboot注册web三大组件web中的三大组件: servlet filter过滤器 Listener监听器由于springboot没有web.xml文件了,有时我们需要把第三方的servlet注册到springboot中。讲解shiro安全框架 7.1 注册servlet到springboot内置的tomcat中(1)创建一个servlet类 public class MyServlet extends HttpServlet { @Override protected void doGet(HttpServletRequest req, HttpServletResponse resp) throws ServletException, IOException { System.out.println("~~~~~~~~~~~~~~~~~~~~~~~~~~~~~~~~~~~~~~~~~~~~~~~"); } @Override protected void doPost(HttpServletRequest req, HttpServletResponse resp) throws ServletException, IOException { System.out.println("************************************************"); } }(2)创建一个配置类 @Configuration //等价于xml配置文件 public class MyConfig { @Bean //等价于xml配置文件 ServletRegistrationBean该类用于注册servlet到tomcat容器中 public ServletRegistrationBean registrationBean(){ ServletRegistrationBean registrationBean=new ServletRegistrationBean(); registrationBean.setName("my"); // 设置Servlet的名称为"my" registrationBean.setServlet(new MyServlet()); // 设置Servlet的实例为自定义的MyServlet对象 registrationBean.addUrlMappings("/my"); // 设置Servlet的URL映射为"/my" return registrationBean; // 返回ServletRegistrationBean对象 } }(3)测试
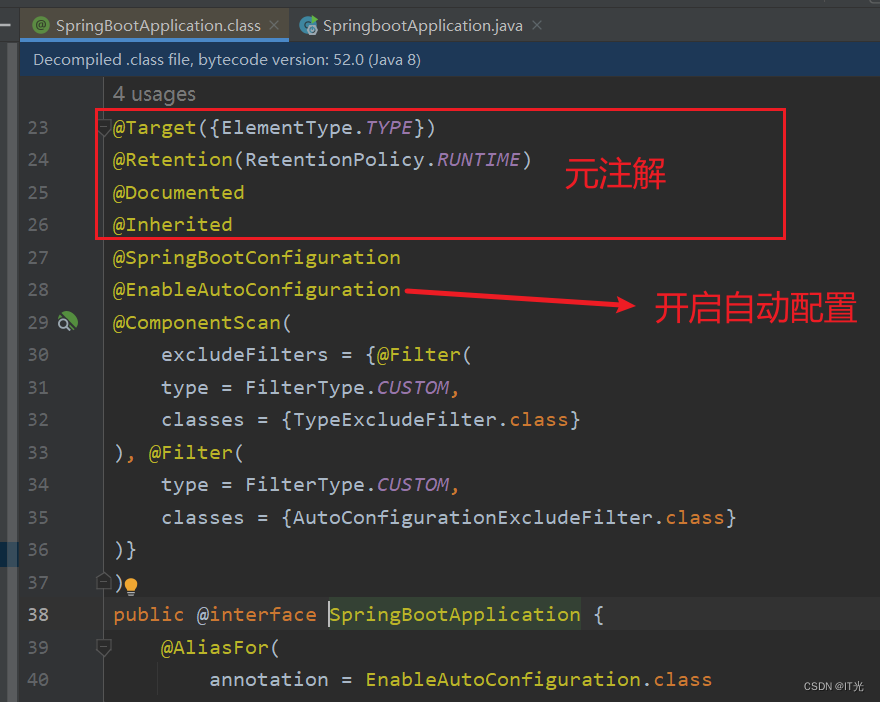
(1)创建一个过滤器类 public class MyFilter implements Filter { @Override public void doFilter(ServletRequest servletRequest, ServletResponse servletResponse, FilterChain filterChain) throws IOException, ServletException { //校验 System.out.println("经过了过滤器~~~~~~~"); filterChain.doFilter(servletRequest,servletResponse);//放行到下一个过滤器 或者 到达请求地址的controller } }(2)过滤器的配置类 @Configuration //等价于xml配置文件 public class MyConfig { //过滤器的配置类 @Bean public FilterRegistrationBean filterRegistrationBean() { FilterRegistrationBean filterRegistrationBean = new FilterRegistrationBean(); filterRegistrationBean.setName("myFilter"); // 设置过滤器的名称为 "myFilter" filterRegistrationBean.setFilter(new MyFilter()); // 设置过滤器实例为 MyFilter 的实例 filterRegistrationBean.addUrlPatterns("/*"); // 设置过滤器的 URL 匹配模式为 "/*",即对所有请求进行过滤 return filterRegistrationBean; // 返回过滤器注册的对象 } } 7.3注册web的监听器Listener组件(1)创建一个监听器类 @WebListener public class MyListener implements ServletContextListener { @Override public void contextInitialized(ServletContextEvent servletContextEvent) { System.out.println("ServletContext 初始化"); } @Override public void contextDestroyed(ServletContextEvent servletContextEvent) { System.out.println("ServletContext 销毁"); } }(2)监听器的配置类 @Configuration //等价于xml配置文件 public class MyConfig { //监听器 @Bean public ServletListenerRegistrationBean listenerRegistrationBean() { // 创建一个 ServletListenerRegistrationBean 实例 ServletListenerRegistrationBean listenerRegistrationBean = new ServletListenerRegistrationBean(); // 设置监听器为 MyListener 的实例 listenerRegistrationBean.setListener(new MyListener()); // 返回配置好的 ServletListenerRegistrationBean 实例 return listenerRegistrationBean; } } 8.springboot自动装配原理Spring Boot 的自动装配原理通过条件注解和条件判断来确定是否需要创建相应的组件,自动配置类定义了创建和配置组件的方法,启动器则简化了依赖管理。这样可以让开发者更加专注于业务开发,减少了手动配置的工作量。 8.1springboot自动包扫描springboot默认扫描的包是哪些? 主类所在的包以及子包。
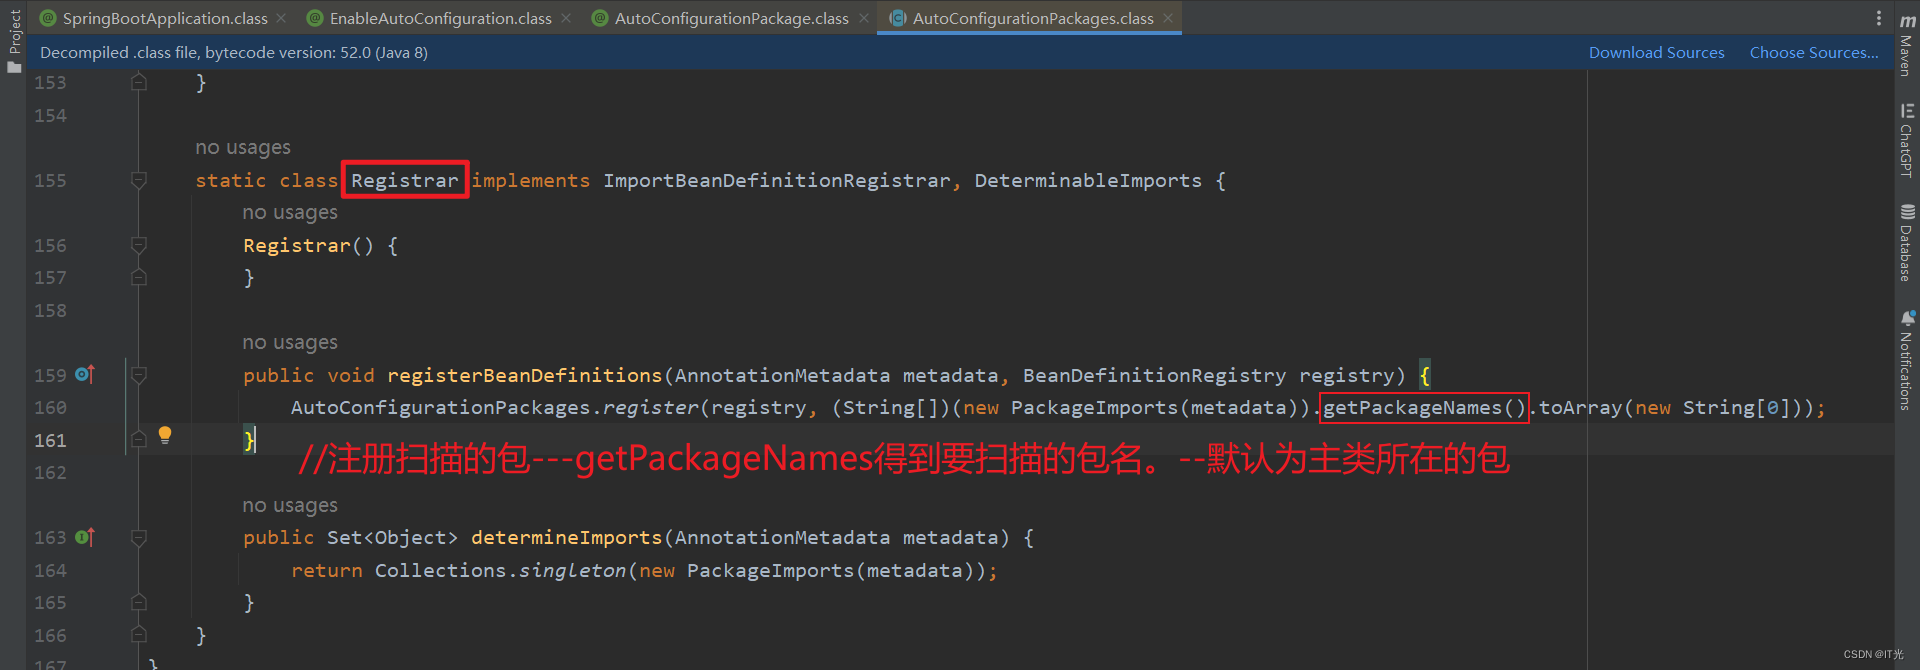
---为什么是这样? 能不能认为改动? 包扫描的核心一定在主类上的@SpringBootApplication上 @SpringBootApplication源码:
可以在主类上使用@ComponentScan来修改默认的包扫描
8.2 自动装配原理 springboot帮你完成自动装配
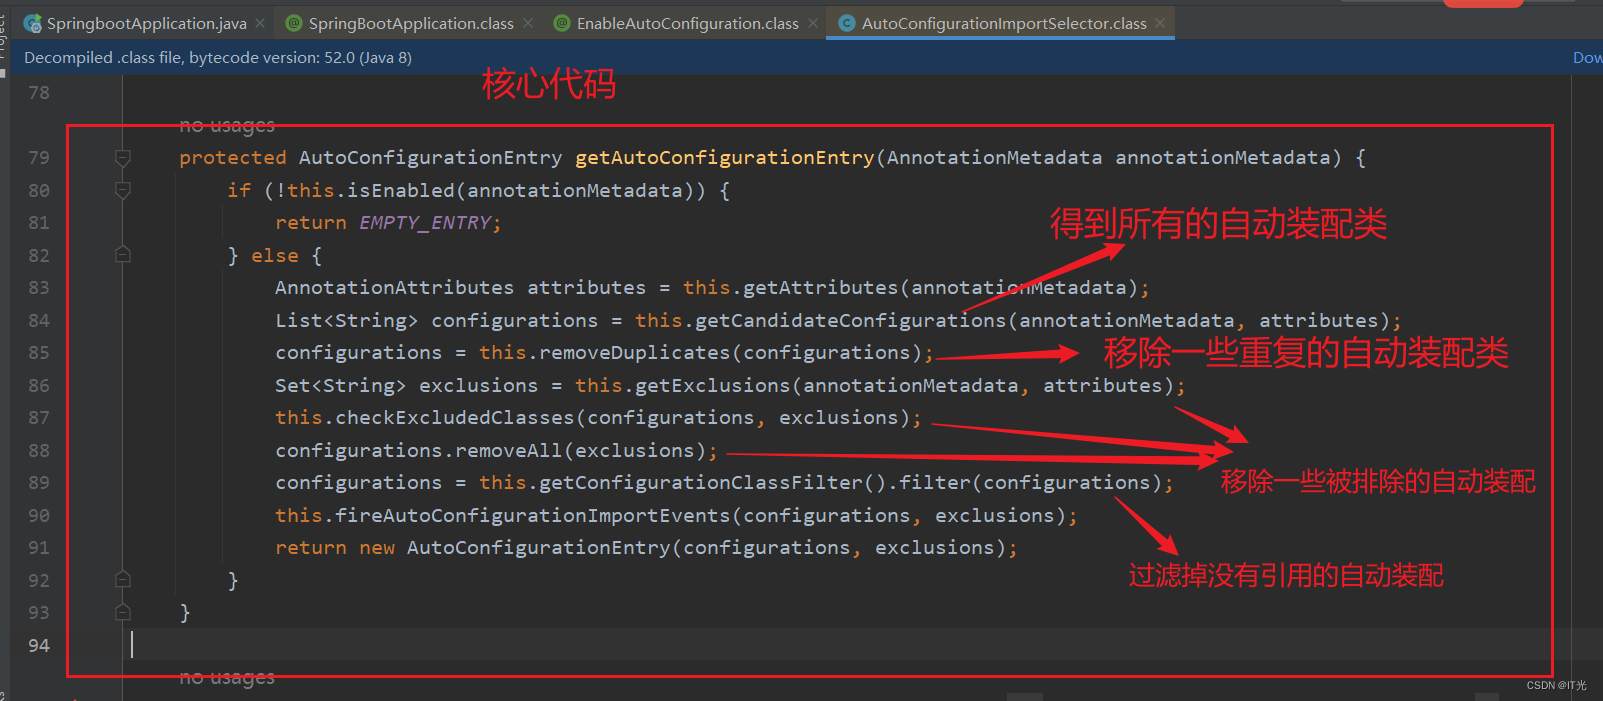
AutoConfigurationImportSelector.class
当主函数运行时会加载一个使用@SpringBootApplication注释的类,@SpringbootApplication它是一个复合组件。其中 @EnableAutoConfiguration它是开启自动配置的核心注解,该注解也是一个复合组件,其中@Import({AutoConfigurationImportSelector.class}) ,该注解需要导入一个AutoConfigurationImportSelector类,该类会加载你需要的自动装配类,而这些自动装配类会完成响应的自动装配功能。 |


【本文地址】