| 【大数据实时数据同步】超级详细的生产环境OGG(GoldenGate)12.2实时异构同步Oracle数据部署方案(中) | 您所在的位置:网站首页 › oracle数据同步 › 【大数据实时数据同步】超级详细的生产环境OGG(GoldenGate)12.2实时异构同步Oracle数据部署方案(中) |
【大数据实时数据同步】超级详细的生产环境OGG(GoldenGate)12.2实时异构同步Oracle数据部署方案(中)
|
系列文章目录
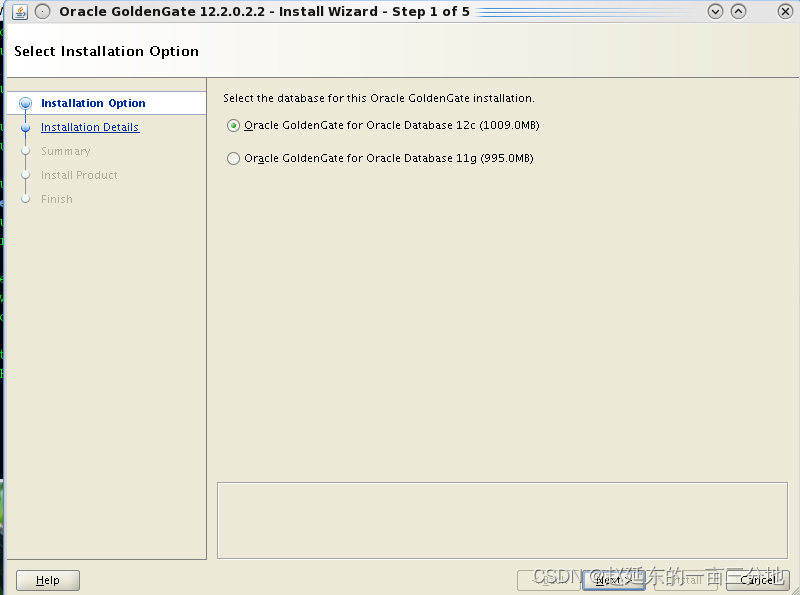
【大数据实时数据同步】超级详细的生产环境OGG(GoldenGate)12.2实时异构同步Oracle数据部署方案(上) 【大数据实时数据同步】超级详细的生产环境OGG(GoldenGate)12.2实时异构同步Oracle数据部署方案(中) 【大数据实时数据同步】超级详细的生产环境OGG(GoldenGate)12.2实时异构同步Oracle数据部署方案(下) 文章目录 系列文章目录前言安装OGG12C软件一、Linux本地GUI方式安装二、远程GUI方式安装三、静默方式安装1、先进入模板文件夹2、编辑模板:3、启用静默安装4、进入到OGG目录创建子目录 总结 前言博主所在单位目前使用Oracle GoldenGate将各个业务生产库汇聚到一起做数仓实时ODS平台,源端库可能涉及Oracle、Mysql、达梦、Guassdb库。 之前写过一系列关于GoldenGate异构同步Mysql、Kafka、Kylin、Flink做实时计算的场景文章。但是突然发现,卧槽最最最应该第一个做的Oracle->Oracle的实时异构同步文档竟然没写! 来弥补一下这个空白!!! 好了,扯远了,回归技术! 下面是我给大家的生产环境下,如何部署GoldenGate12C及异构实时同步数据的解决方案。本文主要介绍如何实现实时异构的进行Oracle->Oracle的数据同步,这种数据同步适用于灾备、升级、实时ODS等场景使用。我这里给大家了三个GoldenGate部署方式,看大家喜欢用哪种吧!! 注意:本部署方案分为三章节,三章节的重点分别是: GoldenGate12C安装前,数据库层面的准备工作!!! 给你GoldenGate12C的三种部署方式,看你喜欢哪种部署方式!!! 配置支持DDL操作的实时数据同步!!! 安装OGG12C软件下面给出三种安装方式: 一、Linux本地GUI方式安装源端 如果是通过GUI方式安装,先切换到root用户,执行xhost+命令,然后切回Oracle用户先进入下面目录: [oracle@ogg ~]$ cd /u01/fbo_ggs_Linux_x64_shiphome/Disk1/ [oracle@ogg Disk1]$ ls install response runInstaller stage然后执行./runInstaller,按下面步骤执行即可:
如果不在本机的linux安装,还想要通过GUI方式安装,可以通过xmanager的xshell搭配Xagent来配置远程GUI安装,因为我用的vmware,如下配置:
然后执行下面命令: export DISPLAY=192.168.1.161:0.0然后开始调用GUI界面安装: [oracle@source ~]$ cd /u01/fbo_ggs_Linux_x64_shiphome/Disk1/ [oracle@source Disk1]$ ./runInstaller调用出来的结果如下:
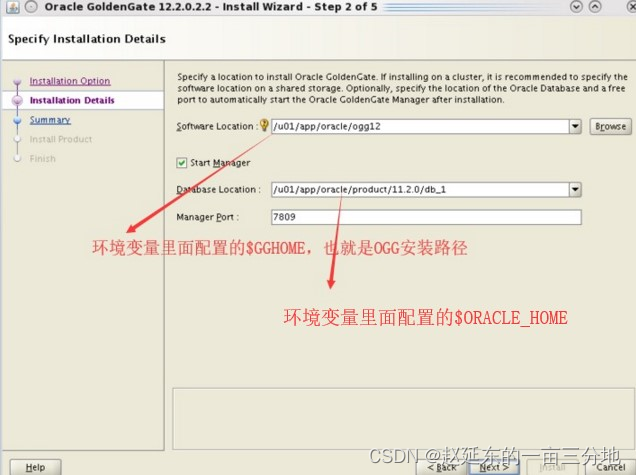
发现都存在,如果之前环境变量export LD_LIBRARY_PATH=$ORACLE_HOME/lib不设置。检查的结果会有一部分为notfound,而且执行./ggsci命令会报 缺少库文件的错。 三、静默方式安装上面的安装方式都是通过gui方式,还有可以通过静默方式安装,使用静默方式安装的方式如下: 1、先进入模板文件夹 [oracle@source ~]$ cd /u01/fbo_ggs_Linux_x64_shiphome/Disk1/response 2、编辑模板: [oracle@source response]$ vim oggcore.rsp #################################################################### ## Copyright(c) Oracle Corporation 2017. All rights reserved. ## ## ## ## Specify values for the variables listed below to customize ## ## your installation. ## ## ## ## Each variable is associated with a comment. The comment ## ## can help to populate the variables with the appropriate ## ## values. ## ## ## ## IMPORTANT NOTE: This file should be secured to have read ## ## permission only by the oracle user or an administrator who ## ## own this installation to protect any sensitive input values. ## ## ## #################################################################### #------------------------------------------------------------------------------- # Do not change the following system generated value. #------------------------------------------------------------------------------- oracle.install.responseFileVersion=/oracle/install/rspfmt_ogginstall_response_schema_v12_1_2 ################################################################################ ## ## ## Oracle GoldenGate installation option and details ## ## ## ################################################################################ #------------------------------------------------------------------------------- # Specify the installation option. # Specify ORA12c for installing Oracle GoldenGate for Oracle Database 12c and # ORA11g for installing Oracle GoldenGate for Oracle Database 11g #------------------------------------------------------------------------------- INSTALL_OPTION=ORA11g ---根据自己的数据库版本来选择,我是11g所以写ORA11g #------------------------------------------------------------------------------- # Specify a location to install Oracle GoldenGate #------------------------------------------------------------------------------- SOFTWARE_LOCATION=/u01/app/oracle/ogg12 ---OGG软件安装目录,我的是/u01/app/oracle/ogg12 #------------------------------------------------------------------------------- # Specify true to start the manager after installation. #------------------------------------------------------------------------------- START_MANAGER=true ---是否在配置完成后自动启动mgr进程,是就选true,否就选false #------------------------------------------------------------------------------- # Specify a free port within the valid range for the manager process. # Required only if START_MANAGER is true. #------------------------------------------------------------------------------- MANAGER_PORT=7809 ---在start_manager为true时添加,选择mgr启动端口号 #------------------------------------------------------------------------------- # Specify the location of the Oracle Database. # Required only if START_MANAGER is true. #------------------------------------------------------------------------------- DATABASE_LOCATION=/u01/app/oracle/product/11.2.0/db_1 ---在start_manager为true时添加,写上$ORACLE_HOME的值 ################################################################################ ## ## ## Specify details to Create inventory for Oracle installs ## ## Required only for the first Oracle product install on a system. ## ## ## ################################################################################ ---如果在安装goldengate前没有安装过其他Oracle产品再填写以下两个参数 #------------------------------------------------------------------------------- # Specify the location which holds the install inventory files. # This is an optional parameter if installing on # Windows based Operating System. #------------------------------------------------------------------------------- INVENTORY_LOCATION= ---指定inventory目录的位置,在使用windows操作系统时是一个可选参数。 #------------------------------------------------------------------------------- # Unix group to be set for the inventory directory. # This parameter is not applicable if installing on # Windows based Operating System. #------------------------------------------------------------------------------- UNIX_GROUP_NAME= ---指定一个组,windows系统时不需要写 3、启用静默安装 ./runInstaller -silent -responseFile /u01/fbo_ggs_Linux_x64_shiphome/Disk1/response/oggcore.rsp之后就会安装了,安装完成会提示有一个安装过程日志,可以通过tail -f命令来看 4、进入到OGG目录创建子目录 [oracle@source ~]$ cd $GGHOME [oracle@source ogg12]$ ./ggsci Oracle GoldenGate Command Interpreter for Oracle Version 12.2.0.2.2 OGGCORE_12.2.0.2.0_PLATFORMS_170630.0419_FBO Linux, x64, 64bit (optimized), Oracle 11g on Jun 30 2017 14:42:26 Operating system character set identified as UTF-8. Copyright (C) 1995, 2017, Oracle and/or its affiliates. All rights reserved. GGSCI (source) 1> create subdirs然后标红的文件夹就都创建出来了,如果是通过GUI方式安装,这些文件夹是自动创建好的不需要再创建。
好了,上面是我给大家介绍的三种安装方式,并且通过其中一种方式给大家介绍了如何远程调用桌面安装。 |
 然后一直向下点然后安装,安装到99时候需要在root下执行一个权限脚本就可。
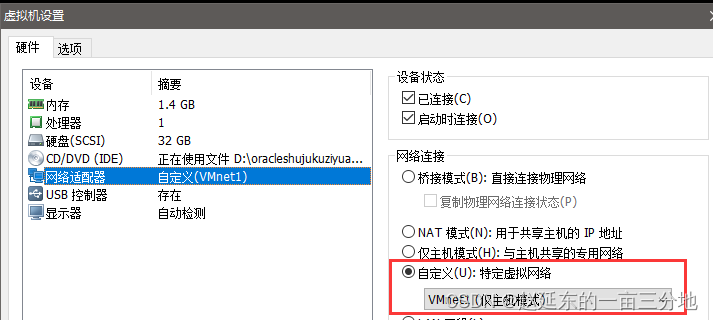 这个网卡我在本地配置的ip是:
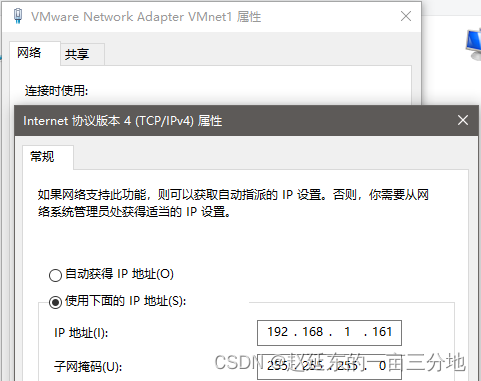 然后我们在xshell配置的链接主库的信息如下:
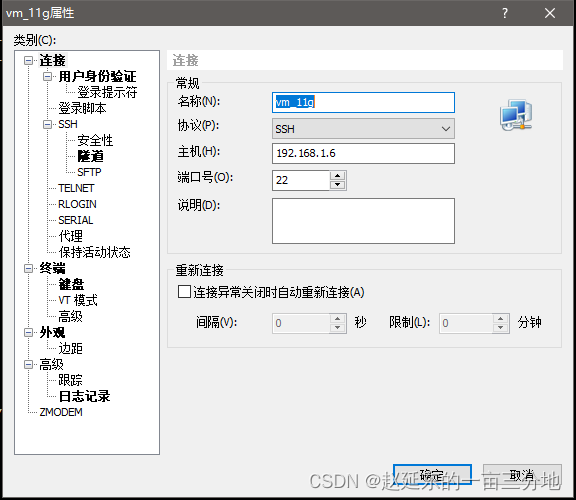 接下来选择ssh,然后选择如下:
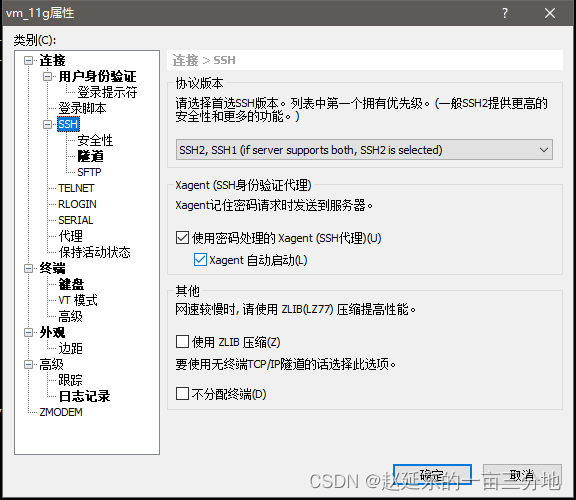 接下来在xshell中还是用root用户执行xhost+,会发现xagent一闪即过:
 剩下的安装步骤就一样了和前面。 安装完成后,进入到ogg安装目录看一下:
 发现相关的文件夹都存在了。不需要再手动create subdirs 接下来进入到OGG12,不过进入之前应该先用ldd命令检查一下ggsci需要的库文件都存在不?
【本文地址】