| 沐枫凌 | 您所在的位置:网站首页 › electron界面可拖拽设计 › 沐枫凌 |
沐枫凌
|
自己的一个项目想要实现在布局中的控件可以随意通过鼠标拖拽改变控件的位置,经过一晚上的资料查找和实际操作终于完成了可以通过拖拽布局中的控件改变控件在布局中的位置的功能。本文拖拽线的代码实现参考了一位大佬的博客而获得的灵感,其主要以C++ Qt实现的功能。 大佬博客链接>>>Qt控件拖拽分割线
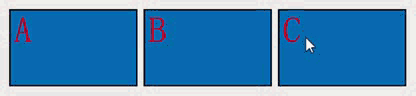
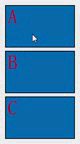
1.案例要求 2.案例实现想法 3.完整代码 4.结束语 ========================================================================= 1.案例要求(1) 控件能够在垂直布局和水平布局中自由移动 (2) 拖拽出去控件的透明 (3) 拖到其他控件边缘的时候要有标识线提示 2.案例实现想法(1)控件在布局中自由移动 使用QDrag实例来承载拖动中控件,在拖出去的时候控件实际上仍然保留着在布局中原有的位置,当选定好要插入的位置后,布局实例主动将控件从原位置中提出并插入到新的位置中。 (2)拖拽出去的控件透明 在设定QDrag的承载QPixmap的时候将QPixmap填充为透明度只有0.5的白板,并且设定Painter的绘制透明度为0.5即可。 (3)拖到其他控件边缘的时候有标识线 首先先设定好一个QLabel对象,设定好QLabel对象的填充颜色并将其隐藏,拖拽控件的时候,使用dragMoveEvent函数监听鼠标移动事件,当鼠标位置处于所处控件的边缘的时候,将设定好的标示线对象(QLabel)移动到指定的控件边缘位置,大小设定为贴合控件边缘的大小并显示,当鼠标移出后又将标示线对象(QLabel)隐藏即可。 3.完整代码 import sys from PyQt5.QtWidgets import QHBoxLayout, QLabel, QMainWindow, QVBoxLayout, QWidget,QApplication from PyQt5.QtCore import QMimeData,Qt from PyQt5.QtGui import QDrag,QPainter,QPixmap,QColor class DragBaseLayout(QWidget): def __init__(self,parent = None): super(DragBaseLayout,self).__init__(parent) self.setAcceptDrops(True) # 必须开启接受拖拽 self.setLayoutType(QVBoxLayout) # 设置布局类型并且设定好布局 self.createComponent() # 生成控件 self.assembleComponent() # 组装控件 # 设定控件的layout类型 def setLayoutType(self,Alayout): self.layout = Alayout() self.setLayout(self.layout) # 初始化内部的控件 def createComponent(self): self.lb1 = QLabel() self.lb1.setPixmap(QPixmap("A.png")) self.lb2 = QLabel() self.lb2.setPixmap(QPixmap("B.png")) self.lb3 = QLabel() self.lb3.setPixmap(QPixmap("C.png")) self.line = LineLable(self) def assembleComponent(self): self.layout.addWidget(self.lb1) self.layout.addWidget(self.lb2) self.layout.addWidget(self.lb3) # 自定义插入控件的函数 def addWidget(self,widget): self.layout.addWidget(widget) # 设定鼠标按下事件 def mousePressEvent(self,event): item = self.childAt(event.pos()) # 通过位置获得控件 if item == None:return # 如果为空则直接跳过 index = self.layout.indexOf(item) # 获得当前控件所处的布局中的索引位置 self.drag = QDrag(item) # 创建QDrag对象 mimedata = QMimeData() # 然后必须要有mimeData对象,用于传递拖拽控件的原始index信息 mimedata.setText(str(index)) # 携带索引位置信息 self.drag.setMimeData(mimedata) pixmap = QPixmap(item.size()) pixmap.fill(QColor(255,255,255,0.5)) # 绘制为透明度为0.5的白板 painter = QPainter(pixmap) painter.setOpacity(0.5) # painter透明度为0.5 painter.drawPixmap(item.rect(),item.grab()) # 这个很有用,自动绘制整个控件 painter.end() self.drag.setPixmap(pixmap) self.drag.setHotSpot(event.pos()-item.pos()) self.drag.exec_(Qt.MoveAction) # 这个作为drag对象必须执行 # 拖拽移动事件(通过实时监测鼠标的位置,并根据位置决定标志线是否显示) def dragMoveEvent(self,event): point = event.pos() currentItem = self.childAt(point) if type(currentItem)==QLabel: geometry = currentItem.geometry() if type(self.layout) == QHBoxLayout: self.Hline(point,geometry,currentItem) elif type(self.layout) == QVBoxLayout: self.Vline(point,geometry,currentItem) else: self.line.hide() # 拖拽放下事件 def dropEvent(self,event): point = event.pos() # 获得落点的坐标 otherItem = self.childAt(point) # 获得当前落点上的控件 if type(otherItem)==QLabel: if type(self.layout) == QHBoxLayout: self.HInsert(point,otherItem) # 改变指定控件的位置(适用于水平布局) elif type(self.layout) == QVBoxLayout: self.VInsert(point,otherItem) # 改变指定控件的位置(适用于垂直布局) # 鼠标拖拽接受事件 def dragEnterEvent(self,event): event.setDropAction(Qt.MoveAction) event.accept() # 判定模式(横向判断) def Hline(self,point,geometry,item): x = geometry.x() x2 = geometry.x()+geometry.width() y = geometry.y() if point.x() |
【本文地址】
公司简介
联系我们