| 海康威视WebSDK | 您所在的位置:网站首页 › vnge插件怎么返回 › 海康威视WebSDK |
海康威视WebSDK
|
最近新需求项目集成WebSDK_V3.3.0的视频插件,开发过程中遇到了一些问题,如下: 无法正确引入插件/InitPlugin报错 使用文档中写的I_DestroyPlugin报错并且再次Init插件后 无法正常播放,报错如下: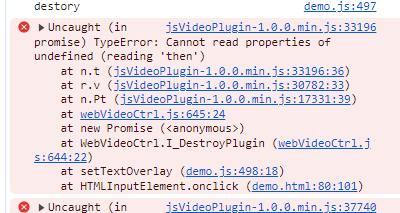
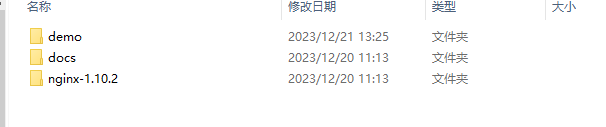
如果你也有类似问题请往下看 首先 开发包如下:
首先 确认你已经正确引入了开发包的demo / codebase 路径下的 jsVideoPlugin-1.0.0.min.js,webVideoCtrl.js 两个文件,(放到项目的静态资源路径下) ,并且安装了插件_HCWebSDKPlugin.exe_ , import '../../../public/static/haikangV2/codebase/webVideoCtrl' //若使用 import a from path 后面就要用 a.I_InitPlugin 我这里直接improt就直接使用webVideoCtrl的函数了只需要引入这一个就行 然后在mounted时,进行插件的init,以下是我的代码。 mounted() { const _this = this //setTimeout不是必须哈 setTimeout(() => { this.InitPlugin() }, 200) _this.$nextTick(() => { $(window).bind({ resize: function () { _this.resizeView() } }) }) }, InitPlugin() { I_InitPlugin({ bWndFull: true, iWndowType: _this.reviewdialogVisible === false ? 2 : 1, bDebugMode: true, // ... 其他回调函数的定 cbInitPluginComplete: function () { // console.log('插件初始化') I_InsertOBJECTPlugin("divPlugin").then(() => { _this.checkInit = true }, () => { _this .$confirm(_this.$t('common.WhetherToDownload'), _this.$t('common.notice'), { confirmButtonText: _this.$t('button.confirmBtn'), cancelButtonText: _this.$t('button.cancelBtn'), type: 'warning' }) .then(() => { window.open('../config/HCWebSDKPlugin.exe') }) .catch(() => { _this.$message.info(_this.$t('common.cancel')) }) }); }, }) },如果此时你的插件不能正常工作,并且在demo里面能正常工作,那么现在要去他的源代码中改动一些东西:
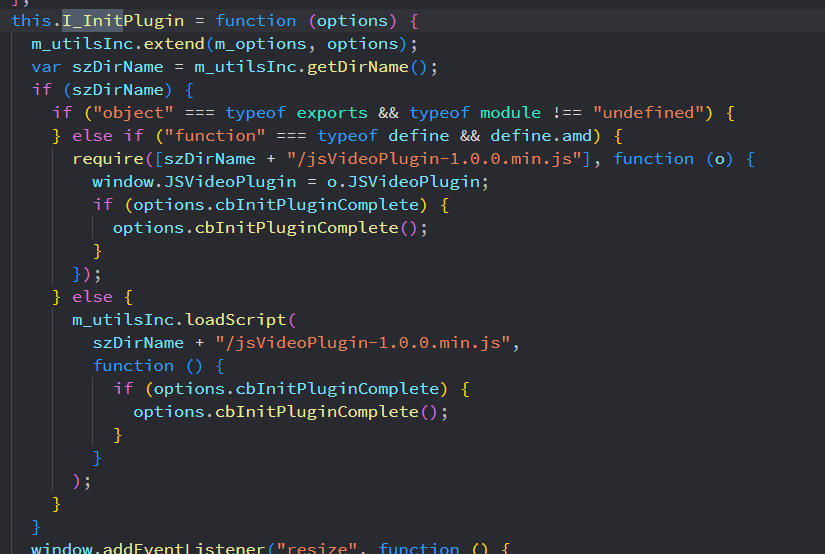
首先格式化一下引入的两个文件,在webVideoCtrl.js中 能找到下面的代码:
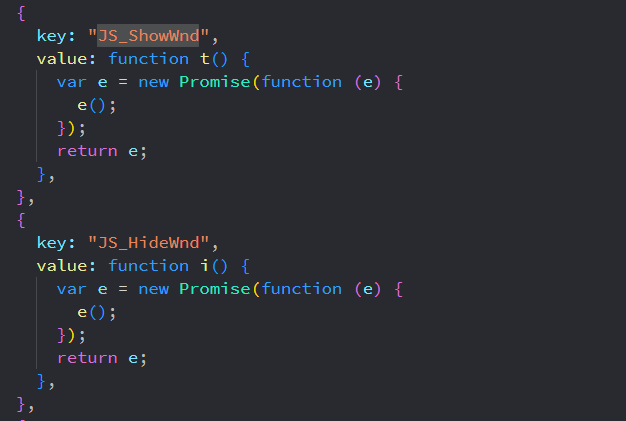
原先有个获取dirName方法,就是获取webVideoCtrl.js自己的文件路径前缀,通过这个路径拼接再去找到jsVideoPlugin.js,但是vue结构下打包后这个文件路径获取肯定不对,因此修改为如下代码: this.I_InitPlugin = function (options) { m_utilsInc.extend(m_options, options); //改动部分 if ('object' === typeof exports && typeof module !== 'undefined') { require(['./jsVideoPlugin-1.0.0.min.js'], function (o) { window.JSVideoPlugin = o.JSVideoPlugin if (options.cbInitPluginComplete) { options.cbInitPluginComplete() } }) } else if ('function' === typeof define && define.amd) { require(['./jsVideoPlugin-1.0.0.min.js'], function (o) { window.JSVideoPlugin = o.JSVideoPlugin if (options.cbInitPluginComplete) { options.cbInitPluginComplete() } }) } else { m_utilsInc.loadScript('./jsVideoPlugin-1.0.0.min.js', function () { if (options.cbInitPluginComplete) { options.cbInitPluginComplete() } }) } window.addEventListener("resize", function () { if (m_pluginOBJECT !== null) { var oElem = $("#" + m_options.szContainerID); m_pluginOBJECT.JS_Resize(oElem.width(), oElem.height()) } }); window.addEventListener("unload", function () { }) }; 2.使用文档中写的I_DestroyPlugin报错并且再次Init插件后 无法正常播放这个问题我和海康开发人员沟通,但是并未获得有效恢复,我的解决办法是,使用_jsVideoPlugin-1.0.0.min.js_中的另外两个函数JS_HideWnd和JS_ShowWnd代替Destory和重新init,格式化_jsVideoPlugin-1.0.0.min.js_就能找到这两个函数。
此时,在webVideoCtrl.js中新建两个函数 this.I_HideWnd = function () { m_pluginOBJECT.JS_HideWnd() this.I_ShowWnd = function () { m_pluginOBJECT.JS_ShowWnd() };然后在自己的页面调用这两个函数就可以实现hide,show 以下是我的代码 注意请先stop当前流再销毁/hide插件,为了最大限度保证插件下次show/Init正常 let stopAll = () => { return new Promise(resolve => { I_StopAllPlay().then(() => { //先stop当前播放的视频,全部stop再hide resolve('success'); }); }); }; stopAll().then(res => { if (res === 'success') { try { // 在I_StopAllPlay()异步操作完成后再执行 I_HideWnd() } catch (e) { console.error('销毁失败', e); } } }); //合适的地方 I_ShowWnd()以下是运行效果: 运行效果 |
【本文地址】
公司简介
联系我们